As part of automation of database and application deployments, it makes sense to be able to create new SQL Server instances quickly and with minimal resources. I have already explored containers and written about it on this blog, but I’d like to turn your attention to setting up SQL Server on Windows Server Core for those of you that run SQL Server on-premise or within VMs in the cloud.
In a domain environment it should be pretty simple to just create a PowerShell session to your target Windows Server where your account is a local administrator and then simply run setup at the command line to install SQL Server, right?
Not quite.
This operation requires Kerberos to work because you are running the installation remotely and you need to delegate to the remote computer and allow the installation user account to be trusted for delegation. If you attempt this without Kerberos authentication you will get this error as demonstrated on my Windows Server 2016 Core machine (called WISTERIA):
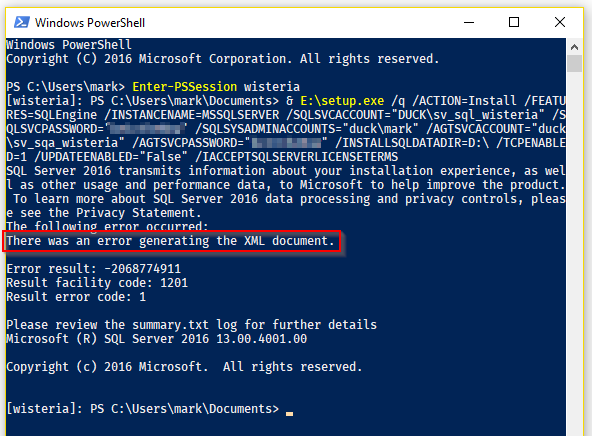
If you look in the Setup Bootstrap folder in the summary.log file you will see the inner exception which is less cryptic than the error generating XML document error we had above:
Overall summary:
Final result: Failed: see details below
Exit code (Decimal): -2068774911
Exit facility code: 1201
Exit error code: 1
Exit message: There was an error generating the XML document.
Start time: 2017-07-20 19:55:03
End time: 2017-07-20 19:55:23
Requested action: Install
Exception help link: http://go.microsoft.com/fwlink?LinkId=20476&ProdName=Microsoft+SQL+Server&EvtSrc=setup.rll&EvtID=50000&ProdVer=13.0.4001.0&EvtType=0xE0C083E6%400xB2215DAC&EvtType=0xE0C083E6%400xB2215DAC
Exception type: Microsoft.SqlServer.Chainer.Infrastructure.ChainerInfrastructureException
Message:
There was an error generating the XML document.
HResult : 0x84b10001
FacilityCode : 1201 (4b1)
ErrorCode : 1 (0001)
Data:
DisableWatson = true
Stack:
at Microsoft.SqlServer.Chainer.Infrastructure.DataStoreService.SerializeObject(String rootPath, Object objectToSerialize, Boolean saveToCache)
at Microsoft.SqlServer.Chainer.Infrastructure.DataStoreService.SerializeObject(Object objectToSerialize)
at Microsoft.SqlServer.Chainer.Infrastructure.PublicConfigurationBridge.Calculate()
at Microsoft.SqlServer.Chainer.Infrastructure.InputSettingService.CalculateSettings(IEnumerable`1 settingIds)
at Microsoft.SqlServer.Chainer.Infrastructure.InputSettingService.CalculateAllSettings(Boolean chainerSettingOnly)
at Microsoft.SqlServer.Chainer.Infrastructure.Action.Execute(String actionId, TextWriter errorStream)
at Microsoft.SqlServer.Setup.Chainer.Workflow.ActionInvocation.<>c__DisplayClasse.<ExecuteActionWithRetryHelper>b__b()
at Microsoft.SqlServer.Setup.Chainer.Workflow.ActionInvocation.ExecuteActionHelper(ActionWorker workerDelegate)
Inner exception type: System.InvalidOperationException
Message:
There was an error generating the XML document.
HResult : 0x80131509
Stack:
at System.Xml.Serialization.XmlSerializer.Serialize(XmlWriter xmlWriter, Object o, XmlSerializerNamespaces namespaces, String encodingStyle, String id)
at System.Xml.Serialization.XmlSerializer.Serialize(TextWriter textWriter, Object o, XmlSerializerNamespaces namespaces)
at Microsoft.SqlServer.Chainer.Infrastructure.DataStoreService.SerializeObject(String rootPath, Object objectToSerialize, Boolean saveToCache)
Inner exception type: System.Security.Cryptography.CryptographicException
Message:
The requested operation cannot be completed. The computer must be trusted for delegation and the current user account must be configured to allow delegation.
HResult : 0x80090345
Stack:
at System.Security.Cryptography.ProtectedData.Protect(Byte[] userData, Byte[] optionalEntropy, DataProtectionScope scope)
at Microsoft.SqlServer.Common.SqlSecureString.WriteXml(XmlWriter writer)
at System.Xml.Serialization.XmlSerializationWriter.WriteSerializable(IXmlSerializable serializable, String name, String ns, Boolean isNullable, Boolean wrapped)
at Microsoft.Xml.Serialization.GeneratedAssembly.XmlSerializationWriterAgentConfigurationPublic.Write6_AgentConfigurationPublic(String n, String ns, AgentConfigurationPublic o, Boolean isNullable, Boolean needType)
at Microsoft.Xml.Serialization.GeneratedAssembly.XmlSerializationWriterAgentConfigurationPublic.Write7_AgentConfigurationPublic(Object o)
Solution
In order to get the installation to work you need to take the following steps:
- Add an SPN for the SQL Server service account.
- Trust the computer you are installing on for delegation.
- Trust the SQL Server service account user for delegation.
- Add the SQL Server service account to local administrators on the target server
- Connect to the target server with the SQL Server service account, and run the installation again.
Let’s go through each of these
1. Add an SPN
You either need to be a domain admin to do this, or have the correct rights in the OUs your Computer and Service accounts are in to create SPNs. I’m not going into the details of how to get that set up here (use Google), so I’ll assume you are Domain Admin. Run the following on your workstation and not on the remote session:
setspn -A MSSQLSvc/<COMPUTER_NAME>:1433 <DOMAIN\MSSQL_SERVICE_ACCOUNT>
On my machine I did this:

2. Trust the computer account for delegation
Load Active Directory Users and Computers, which should be in Administrative Tools on the domain controller, or you can install the RSAT package from Microsoft on your workstation. Find the computer account, right click and select properties. Then choose the second option.
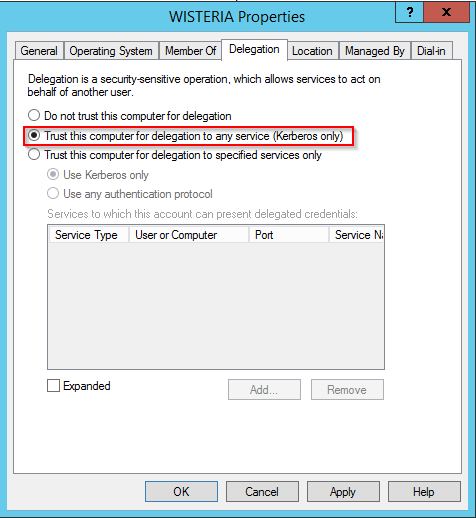
You can do this in PowerShell too if you want an automated script. I Googled it for you: http://www.itadmintools.com/2011/08/enable-trust-for-kerberos-delegation-in.html
3. Trust the SQL Server service account user for delegation
Now do the same thing for the SQL Server service account.
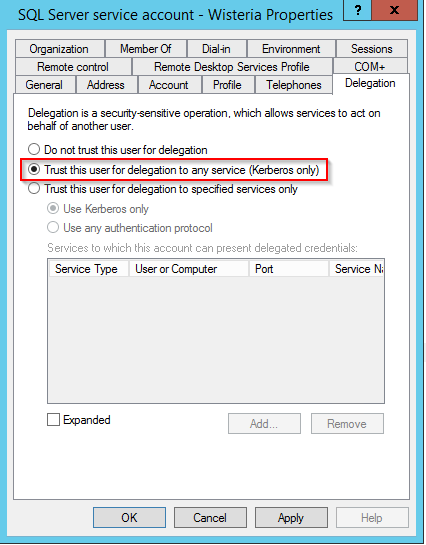
Choose the second option.
4. Add the SQL Server service account to local Administrators
I’ve always found it more reliable to install SQL Server using the service account when doing it remotely, especially on Core. To do this you will need to add the service account to local admins. This can be done in PowerShell if you want to automate (you should), or you can do it via Computer Management from your workstation by right clicking Computer Management root node and then Connect to another computer:
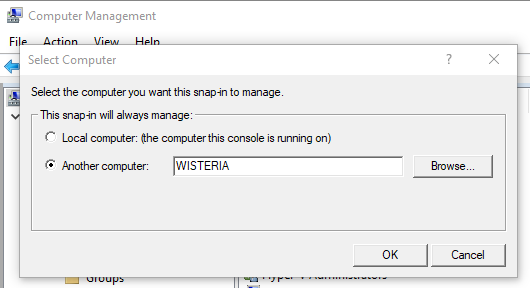
Then in System Tools, expand Local Users and Groups, click Groups, then right click Administrators, then Properties. In this Window, click Add… and enter your domain SQL Server service account.
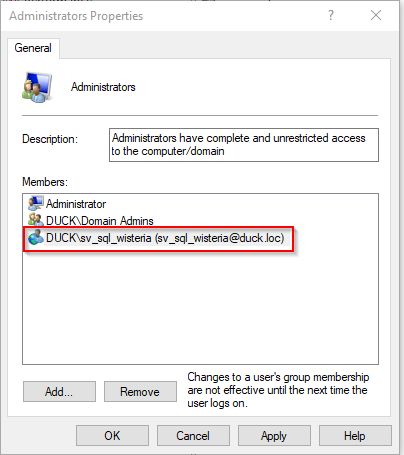
Now you should be ready to install SQL Server on Windows Server Core without any trouble.
5. Install SQL Server
In PowerShell, create a credential with:
$cred = Get-Credential
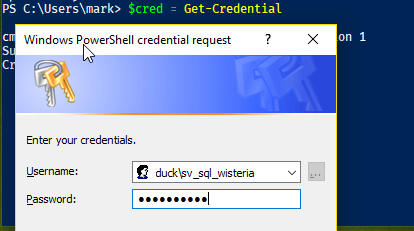
Enter the credentials, then connect to the server with those credentials. Then enter setup again, like so:
Enter-PSSession -ComputerName wisteria -Credential $cred

& E:\setup.exe /q /ACTION=Install /FEATURES=SQLEngine /INSTANCENAME=MSSQLSERVER /SQLSVCACCOUNT="DUCK\sv_sql_wisteria" /SQLSVCPASSWORD="********" /SQLSYSADMINACCOUNTS="duck\mark" /AGTSVCACCOUNT="duck\sv_sqa_wisteria" /AGTSVCPASSWORD="********" /INSTALLSQLDATADIR=D:\ /TCPENABLED=1 /UPDATEENABLED="False" /IACCEPTSQLSERVERLICENSETERMS
This results in success.
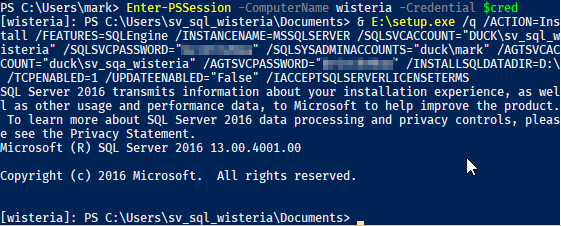
You can now remove the SQL Server service account from Local Administrators after you have exited your PowerShell remote session. If we now check the summary log from the install, we can see there are no errors:
Overall summary:
Final result: Passed
Exit code (Decimal): 0
Start time: 2017-07-20 20:27:15
End time: 2017-07-20 20:31:19
Requested action: Install
Machine Properties:
Machine name: WISTERIA
Machine processor count: 2
OS version: Microsoft Windows Server 2016 Datacenter - ServerCore (10.0.14393)
OS service pack:
OS region: United Kingdom
OS language: English (United States)
OS architecture: x64
Process architecture: 64 Bit
OS clustered: No